
Energy costs are on the rise. Want to know the secret #1 way to reduce heating and cooling costs for your home?
Quick Answer: Warm air rises, and up to 85% of your home’s heat escapes through the attic. Most attics are not sufficiently insulated, which costs you extra money every month as your heating unit cranks out a lot more heat trying to keep up. Poorly insulated homes mean high gas bills in winter and high electric bills in the summer months.
Adding attic insulation is a one-time cost that saves you money every month in the future.
What Is Blown-In Attic Insulation?
Blown-in insulation (or ‘loose-fill’ insulation) is a fibrous insulating material that is installed by ‘blowing’ or spraying the material using a machine that breaks up the material and delivers it to the space in question via an air hose. An alternative to rolls, batts and foam board insulation, blown-in insulation is the preferred choice for covering large areas like home and garage attics and fills every gap and corner seamlessly. Attic insulation works by expanding to create many tiny air pockets that form an insulative layer.
Proper attic insulation blocks the flow of air through upper ceilings. However, many homes that were built to “normal” code standards (especially new construction) only have the minimally required amount of insulation, which, as evidenced by your presumably high heating bills, is just not getting the job done.
Read on to learn how to evaluate whether your home needs additional attic insulation.
How Much Insulation Do You Need?
A layer of material’s insulating capability is measured by a metric called “R-Value.” The higher the R-Value, the slower heat energy will escape through the layer of material.
For our Chicago climate, the Department of Energy recommends a total R-value of R49–R60. To achieve this range, we recommend filling up to a total depth of 20 inches (old insulation + new) and installing a cover over your attic entrance(s).
Installation Process
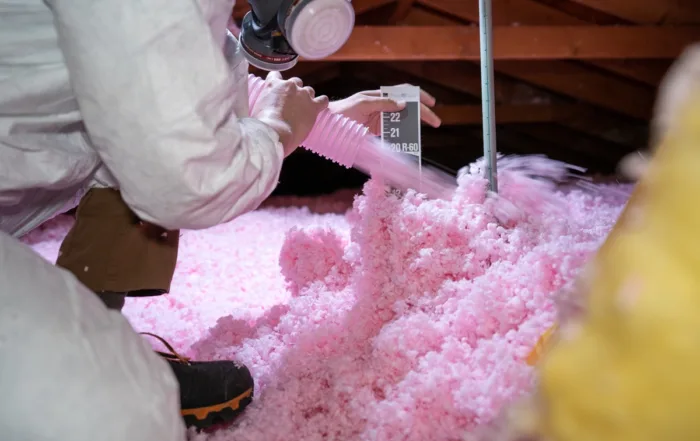
Adding blown-in fiberglass insulation to your attic is not as difficult as you may think. Our 2-man crew takes just 1-2 hours to complete most insulation projects. One person uses the blower hose to deploy the fiberglass insulation in the attic, and the other feeds bales of the ProCat fiberglass product into the blower unit in an outdoor location. The blower unit is a specialized piece of machinery that ‘fluffs up’ the compacted fiberglass material so that more air pockets are created when it is installed (better insulation), which is what makes it such an effective material. To finish the job, we install an insulated cover over the access hatch.
Fiberglass vs Cellulose
We recommend Owens Corning’s ProCat blown-in fiberglass insulation over cellulose alternatives for several reasons:
Cellulose insulation does technically offer a higher R- value per square inch at the time of installation, but cellulose settles over time, causing it to lose its insulating properties. Fiberglass will not settle. For this reason, along with the harsh chemical treatments added to cellulose (bad for the environment!) and its messy installation process in your home, we recommend blown-in fiberglass insulation as the best long-term choice.